
Pizza has always felt familiar to me.
When I was just starting college, I worked at a small pizza place tucked into the back of a party store in my hometown in Michigan. I wasn’t the one making the dough from scratch, but I did everything else — rolling it out, adding sauce, layering on cheese and toppings, and cooking pizzas in the oven during busy shifts. Being part of that process over and over made pizza feel approachable, not intimidating. It was simple food, done consistently, and meant to feed people quickly and comfortably.
Later on, pizza took on a different kind of meaning when I married into a family where Friday night pizza was a tradition. No matter how the week went, pizza was always there to end it. We carried that tradition into our own family, and now Friday nights often turn into pizza followed by a game night or a movie — usually with popcorn if we’re still awake.
When I started paying closer attention to what we were eating and wanting to make small changes without overhauling everything, pizza felt like an easy place to start. It was already part of our rhythm. Making the dough at home became one small way to make something familiar feel a little more intentional — without taking the fun out of it.
This is the pizza dough recipe I make now. It’s simple, forgiving, and meant for real life.
What you’ll need
I use a stand mixer for this recipe because it makes the process easier and more hands-off. You can do this by hand with a bowl, spoon, and some kneading — but this is how I do it at home.
- Stand mixer with dough hook
- Two bowls (one small, one large)
- Measuring cups and spoons
- Kitchen towel or cover for rising
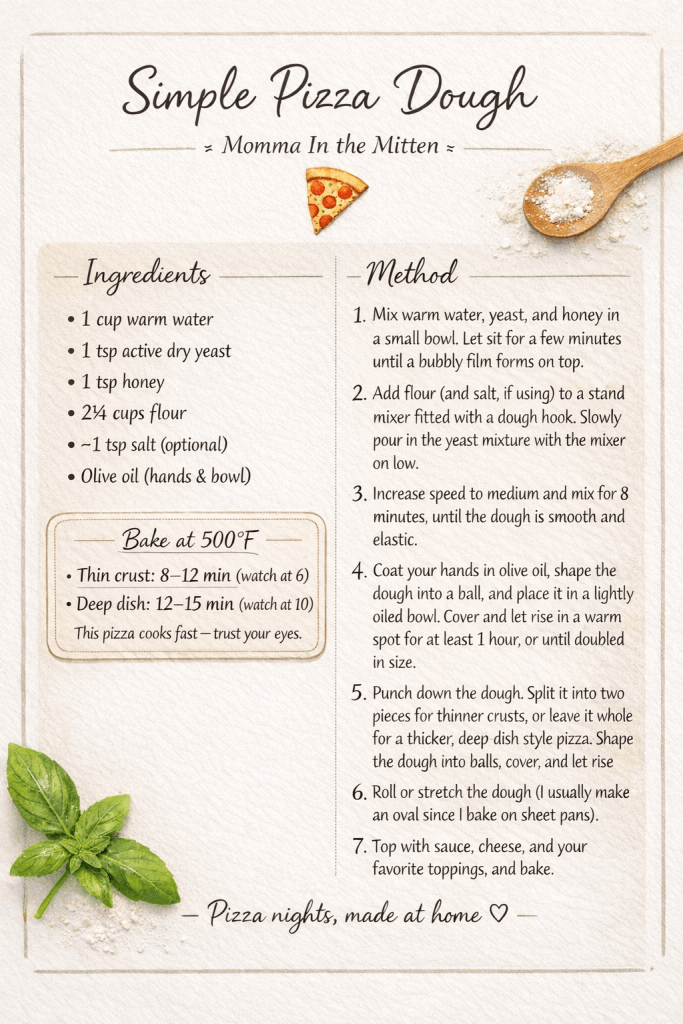
Ingredients
- 1 cup warm water
- 1 teaspoon active dry yeast
- 1 teaspoon honey
- 2¼ cups flour (I use unbleached because that’s what I keep on hand)
- About 1 teaspoon salt (optional)
- Olive oil (for hands and bowl)
How I make it
I start by mixing the warm water, honey, and yeast together in a small bowl. I let it sit for a few minutes until a bubbly film forms on top — that’s how I know the yeast is ready.
While that’s resting, I add the flour (and salt, if I remember) to the bowl of my stand mixer fitted with the dough hook. With the mixer running on low, I slowly pour in the yeast mixture.
Once everything is combined, I increase the speed to medium and let the mixer run for about eight minutes, until the dough is smooth and elastic and pulling away from the sides of the bowl.
I coat my hands with olive oil so the dough doesn’t stick, then remove it from the mixer and gently shape it into a ball. I place the dough into a bowl that’s lightly coated with olive oil, cover it, and let it rise in a warm spot for at least one hour — longer if the kitchen is cool — until it’s doubled in size.
Once risen, I punch the dough down. At this point, I usually split it into two pieces for thinner crust pizzas, but if you want more of a deep-dish style crust, you can leave it as one ball. I shape the dough into balls again, cover them, and let them rise a second time.
After the second rise, the dough is ready to roll out, shape, and turn into pizza.
Shaping & baking notes
I usually roll my dough into more of an oval shape instead of a perfect circle since I bake on sheet pans. If it’s uneven or looks a little rustic, that’s fine — it doesn’t need to be perfect.
Once shaped, I transfer the dough to a lightly greased or parchment-lined sheet pan, add sauce, cheese, and toppings, and bake at 500°F.
Thin crust: 8–12 minutes (Start watching closely around the 6-minute mark) Deep dish: 12–15 minutes (Start watching around the 10-minute mark)
This pizza can cook fast, so I don’t rely on the timer alone. I look for the crust to be lightly golden or feel firm and set, and for the cheese and toppings to be browned the way I like them. Once you’ve made it a few times, you’ll get a feel for how long your oven needs.
Pizza night doesn’t need to look the same every week for it to matter. This dough is just one option we come back to when it fits — sometimes from scratch, sometimes not. The goal isn’t perfection, it’s keeping a familiar tradition going in a way that works for real life.


Leave a comment